This lesson by Goodwill Community Foundation copy right.
Windows XP is an operating system produced by Microsoft. An operating system is the software that makes your computer functional and is responsible for running all the other software. Start learning about Windows XP today.
Windows XP is an operating system that lets you use different types of applications or software. For example, it allows you to use a word processing application to write a letter, and a spreadsheet application to track your financial information.
Windows XP is a graphical user interface (GUI). It has pictures (graphical) that you use (user) to communicate (interface) with the computer. This type of system is popular because it's logical, fun and easy to use.
................................................................................................................................................................


Windows XP is an operating system produced by Microsoft. An operating system is the software that makes your computer functional and is responsible for running all the other software. Start learning about Windows XP today.
Windows XP is an operating system that lets you use different types of applications or software. For example, it allows you to use a word processing application to write a letter, and a spreadsheet application to track your financial information.
Windows XP is a graphical user interface (GUI). It has pictures (graphical) that you use (user) to communicate (interface) with the computer. This type of system is popular because it's logical, fun and easy to use.
This operating system has multitasking capabilities, meaning it can run several applications at the same time. Multitasking allows you to view this lesson on the Internet at the same time that you practice using other applications with Windows XP.
....................................................................................................................................
The Windows XP Desktop
Like previous versions of Windows, Windows XP uses a desktop for the standard interface. Think of the desktop as a workspace where you can access everything you need to operate your computer, such as system components, applications, the Internet, etc.The desktop contains:
- Start button: one of the most important tools you will use while working with Windows XP. The Start button allows you to open menus and start applications.
- Taskbar: primarily used to switch between open windows and applications. Learn more about using the Taskbar in a later lesson.
- Icons (or graphical pictures): represent applications, files, and other parts of the operating system. By default Windows XP provides you with one desktop icon, the Recycle Bin. Learn more about the Recycle Bin in a later lesson.
..............................................................................................................
The Start Menu
To begin exploring Windows XP, click the Start button.- When you click the Start button, the Start menu appears. The Start menu is your gateway to the applications that are on your computer. The left side of the Start menu lists programs, and the right side allows access to common Windows folders (My Documents, for example). It also provides access to Help and Support, Search, and Run.
- If you select All Programs, a pop-up menu appears. Pop-up menus like this are called cascading menus. If a cascading menu is available, a small black triangle appears next to the name of the application or function.

To explore the Start menu:
- Click the Start button.
- Move the mouse pointer to each option, and view the various cascading menus.
- Click (or roll your mouse pointer over) All Programs.
- Move the mouse pointer to the right and view other cascading menus.
- To exit the menus, click outside the menu area or press Esc on your keyboard.
................................................................................................................................................................
Understanding Icons
The small pictures on the desktop are called icons. One type of icon is an object icon. Examples of object icons are My Computer, Recycle Bin, and Internet Explorer. These icons allow you to open files and programs on your computer.
Shortcut icons allow you to open an application quickly. These icons appear on your desktop and with little arrow in the left corner. Desktop shortcuts are links to files and programs. You can add or delete shortcuts without affecting the programs on your computer. You'll learn about creating shortcuts in a later lesson.

To open a program using an icon:
- Place your mouse over the icon.
- Text appears identifying its name or contents.
- Then, double-click the icon.
Understanding the Taskbar
The taskbar is the small blue bar you see at the bottom of your desktop. It contains the Start menu and the Quick Launch bar, which contains icons for Internet Explorer, Windows Media Player, and Show Desktop. Click an icon to open a program. Click Show Desktop to quickly view your desktop without closing any programs or windows.
The box on the right is called the Notification Area. Here, you'll find the clock and several other icons depending on what you have installed on your computer. Other icons appear in the Notification Area detailing the status of your activity. For example, when you're printing a document, a printer icon appears. Microsoft also uses the Notification Area to remind you when software updates are available for download.

When you open or minimize a window or program, a rectangular button appears on the taskbar that shows the name of the application. These buttons disappear when you close a window. Learn more about switching between windows in lesson 4.
Windows XP even enables you to log off the computer so someone else can log on without having to restart the computer.

.....................................................................................................................................................................

If you're experiencing computer problems or have installed something new, you can simply restart your computer.
.......................................................................................................................................................................
.................................................................................................................
Log off and Switch Users
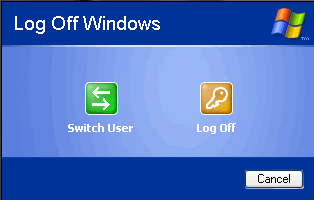
More than one person may use your computer. For example, many family members may use the same computer at home while several coworkers may be able to access your computer on a computer network. Windows XP allows everyone who uses your computer to have separate computer accounts. A computer accounts tracks each person's unique settings, documents, and email accounts.Windows XP even enables you to log off the computer so someone else can log on without having to restart the computer.
To log off/switch users:
- Click the Start menu and click Log Off.
- A dialog box appears asking you if you want to Switch User or Log Off.
- Switch User allows someone else to log on to the computer. If you choose to Switch User, your applications will continue to run in the background while the new user logs on.
- If you choose Log Off, your applications will close.
- In any case, you're taken to a Windows XP logon screen where you're prompted to enter your username and password.

.....................................................................................................................................................................
Turn Off and Restart the Computer
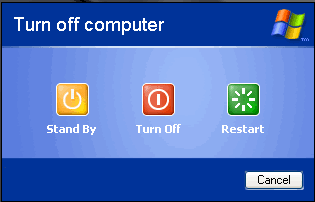
When you've finished using Windows XP, be sure to turn off (or shut down) the computer correctly.To turn off the computer:
- Click the Start menu.
- Click Turn Off Computer.
- A dialog box opens. Click Turn Off.

If you're experiencing computer problems or have installed something new, you can simply restart your computer.
To restart the computer:
- Click the Start menu.
- Click Turn Off Computer.
- A dialog box opens. Click Restart.
.......................................................................................................................................................................
Challenge!
- View the Start button, taskbar and icons on the Windows XP desktop.
- Click the Start button and view the cascading menus.
- Practice logging off and switching between users.
- Shut down your computer properly.


No comments:
Post a Comment