Pages

Saturday, May 15, 2010

Window xp lesson 4

This blog by ©1998-2010 Goodwill Community Foundation, Inc. All rights reserved.

Minimizing, Maximizing, and Restoring Windows

Windows allows you to easily enlarge, hide, or shrink a window using the Minimize, Maximize, and Restore buttons.

The Minimize button is among the three buttons at the right end of the title bar. This button has a small dash (or minus sign). The Minimize button shrinks the window and places it on the taskbar while leaving the program running.

The Maximize button, which looks like a small window, is used to enlarge a window to cover the entire desktop.

Minimize, Maximize, and Close buttons

After a window is maximized, the Maximize button changes to the Restore button. It looks like two windows near one another. If you click the Restore button, the maximized window shrinks to its previous size (the size it was before you maximized it).

Minimize, Restore, and Close buttons


Sizing Windows

Sizing window is slightly different from minimizing, restoring, or maximizing. Note: You cannot size a window if it's been maximized.

To change the size of a window:
  • Hover the mouse pointer over any corner of the window. (You can also place the pointer over the borders of the window.)
  • The mouse pointer changes into a double-headed arrow.
  • Clickand hold down the left mouse button.
  • Drag the arrow out or in to make the window larger or smaller.
  • Release the mouse button when the window is the size you want.

Double-headed arrow

Make sure the mouse pointer change into a two-headed arrow before you try to size the window.

Moving a Window Using the Title Bar

Sometimes a window may obscure an item you want to click on or view.

To move a window:
  • Place the mouse pointer over the title bar (at the top of the window).
  • Click and hold down the left mouse button. (You cannot move a window that has been maximized other than to use the Minimize button.)
  • Drag the window to the place where you want it and release the mouse button.

titlebar


Tiling and Cascading Windows

Sometimes, moving and sizing multiple windows can create confusion. To keep better track of multiple windows, try cascading or tiling the windows.

Cascading windows are layered on top of each other.

Tiled windows are next to each other. Windows can be tiled horizontally or vertically. If windows are tiled horizontally, they appear one above another. If windows are tiled vertically, they appear side by side.

To cascade or tile windows:
  • With two or more windows open, right-click on a blank area of the taskbar.
  • Choose Cascade Windows, Tile Windows Horizontally, or Tile Windows Vertically.
To return to your previous window arrangement:
  • Right-click on a blank area of the taskbar.
  • Select the Undo command.
To show the desktop:
  • Right-click on a blank area of the taskbar.
  • Choose Show the Desktop.

Switching Between Windows

Windows XP allows you to have more than one program open at the same time. It also allows you to easily move between open windows. The window you select becomes the active window. When a window is active on the desktop, its title bar (and button on the taskbar) is blue. When a window is inactive, the title bar is light blue.

To switch between windows:
  • Open more than one program.
  • Size the windows so they're open on the desktop.
  • Click on any part of the window you want to work with.

OR

  • Click the program buttons on the taskbar to activate the window you want to work with.

Unlike previous versions of Windows, Windows XP keeps the taskbar from getting too cluttered. It groups the buttons when too many accumulate on the taskbar. For example, when you open Outlook Express, you'll see one button on the taskbar. However, if you have three or more email message windows open, one button represents the Outlook Express's open windows.

Simply click the button to select from the pop-up list of open windows.

taskbar button

Double-headed arrow

choosing a taskbar button from the pop-up window

Switching Using the Keyboard Method

When you have more than one window open, you can also switch between them using the keyboard.

To switch between window using the keyboard method:
  • Open more than one program or window.
  • Press and hold down the Alt key while pressing the Tab key.
  • A menu featuring file and program icons appears.
  • Tab to the window you want to view. Once it's outlined with a box, release both keys..


Challenge!

  • Practice minimizing, maximizing, and restoring windows
  • Move a window using the Title bar
  • Click and drag to resize a window
  • Practice tiling and cascading windows
  • Switch between windows using both methods described in this lesson.


Window xp lesson 3

Windows XP Bars and Buttons

Windows XP got its name from one its most basic elements: the window. The rectangular work area for a program, file, or other task is called a window.

Below is an example of a Microsoft Word window. While Word is a word-processing program, the example below features many of the elements common in Windows XP.

Word window

The workspace is the white area inside the window. This is where you do your work with a program, such as writing a letter. Depending on what program you're working with, the workspace will appear differently.

++++++++______+++++++_______+++++++_____+++++++


More Windows XP Bars and Buttons

Windows XP offers several tools, menus, and commands that make the operating system easy-to-use.

The title bar is the horizontal bar at the top of a window. It's displayed as white text on blue background by default.

titlebar

The Control menu button is the icon at the far left end of the title bar. The Control menu button opens a menu you can use to control the window.

Control menu

The Close button is at the far right end of the title bar. It looks like a box with an X in it. Click the Close button to close a window or to exit a program. Next to the Close button, you'll see the Minimize and Maximize buttons. Learn more about these buttons in the next lesson.

Close button

^^^^^&&&&^^^^^&&&&&^^^^^^&&&&&^^^^^^&&&&&&


More Windows XP Bars and Buttons

The menu bar is the below the title bar. It contains several menus, which let you see a list of commands.

menu bar

Some menu options are followed by ellipsis, or... Choosing a menu option followed by an ellipses will open a dialog box, which feature helpful tools to help you perform tasks.

Format menu menu

Some Windows XP programs have toolbars across the top of the window. The toolbar buttons allow you to print, cut, paste, or do other tasks. The options vary depending on the program.

toolbars

To review taskbar functionality, see a lesson 1.

???@@@??@@??@@??@@??@@??@@??@@??@@??@@??@@


Scrolling

The scroll bar appears at the right side or the bottom of a window when all the information in that window can't be seen at the same time. Use the scroll bar to view hidden information.

The scroll bar features scroll arrows that allow you to move easily through a document. It's especially convenient when viewing a long document.

Word window with scroll bar labeled

To scroll:
  • Click the up arrow button arrow to scroll up.
  • Click the scroll down button arrow to scroll down.
  • Click the up double arrow arrows to scroll up one page at a time.
  • Click the down double arrow arrows to scroll down one page at a time.
  • Click the scroll to browse button to open a browse menu.

OR

  • Click and drag the scroll bars to view your document.
!!!!^^^^^^^^^^!!!^^^^^^^^!!!!^^^^^^^!!!!^^^^^^^!!!

Challenge!

  • Click Start.
  • Choose All Programs Accessories Notepad.
  • Choose File from the menu bar.
  • While holding down the left mouse button, move the mouse pointer over the other menus (Edit, View, etc.) to view the drop down menus.
  • Choose Format Font to open the Font dialog box.
  • Close the Font dialog box.

Window xp lesson 2

This blog by ©1998-2010 Goodwill Community Foundation, Inc. All rights reserved.

Exploring Programs

Programs enable you to do work on the computer. For example, a word processing programs such as Microsoft WordPad allows you to create a basic document. You can easily open a program from the Start menu using the All Programs button.

To open a program using the Start menu:
  • Click Start.
  • Click All Programs and slide your mouse pointer until you've selected the program you want to open (it turns blue).
  • Click to open the program you've selected. (Remember, programs with small black arrows beside them will open another cascading menu. Simply drag your mouse pointer to make your selection.)
  • To close a program, click the Close button located at the top right of the window.

Open the All Programs menu to open WordPad

<<<<...........................................................................................>>>>

Launching Internet Explorer from the Start menu

Internet, another choice on the Start menu, opens Internet Explorer; the web browser that comes bundled with Windows XP.

To launch Internet Explorer from the Start menu:
  • Click Start.
  • Choose Internet.
  • Click to open Internet Explorer.
  • To close a program, click the Close button located at the top right of the window.

Open Internet Explorer using the Start menu

Note: You must be connected to the Internet for Internet Explorer to open a web page.

Launching Microsoft Outlook Express from the Start menu

Email, another choice on the Start menu, opens Microsoft Outlook Express; the email client that comes bundled with Windows XP.

<<< *********________********______******>>>>

To launch Outlook Express from the Start menu:
  • Click Start.
  • Choose Email.
  • Click to open Microsoft Outlook Express.
  • To close Outlook Express, click the Close button located at the top right of the window.

Open Outlook Express using the Start menu

#### @@@@@##### %%%% ~~~~~~~$$$$$$$$$

Challenge!

  • Open the Calculator on your computer. (It's located under All ProgramsAccessories.)
  • Close the Calculator
  • Launch Internet Explorer from the Start menu.
  • Close Internet Explorer.
  • Launch Outlook Express from the Start menu.
  • Close Outlook Express.

Window xp lesson

This lesson by Goodwill Community Foundation copy right.

Windows XP is an operating system produced by Microsoft. An operating system is the software that makes your computer functional and is responsible for running all the other software. Start learning about Windows XP today.
Windows XP is an operating system that lets you use different types of applications or software. For example, it allows you to use a word processing application to write a letter, and a spreadsheet application to track your financial information.
Windows XP is a graphical user interface (GUI). It has pictures (graphical) that you use (user) to communicate (interface) with the computer. This type of system is popular because it's logical, fun and easy to use.
This operating system has multitasking capabilities, meaning it can run several applications at the same time. Multitasking allows you to view this lesson on the Internet at the same time that you practice using other applications with Windows XP.
....................................................................................................................................

The Windows XP Desktop

Like previous versions of Windows, Windows XP uses a desktop for the standard interface. Think of the desktop as a workspace where you can access everything you need to operate your computer, such as system components, applications, the Internet, etc.


The desktop contains:
  • Start button: one of the most important tools you will use while working with Windows XP. The Start button allows you to open menus and start applications.
  • Taskbar: primarily used to switch between open windows and applications. Learn more about using the Taskbar in a later lesson.
  • Icons (or graphical pictures): represent applications, files, and other parts of the operating system. By default Windows XP provides you with one desktop icon, the Recycle Bin. Learn more about the Recycle Bin in a later lesson.
Your desktop's appearance may vary from the example shown below, especially if you bought a computer with XP preinstalled.

..............................................................................................................

The Start Menu

To begin exploring Windows XP, click the Start button.


  • When you click the Start button, the Start menu appears. The Start menu is your gateway to the applications that are on your computer. The left side of the Start menu lists programs, and the right side allows access to common Windows folders (My Documents, for example). It also provides access to Help and Support, Search, and Run.


  • If you select All Programs, a pop-up menu appears. Pop-up menus like this are called cascading menus. If a cascading menu is available, a small black triangle appears next to the name of the application or function.
In the example below, the Word program has been selected.


To explore the Start menu:
  • Click the Start button.
  • Move the mouse pointer to each option, and view the various cascading menus.
  • Click (or roll your mouse pointer over) All Programs.
  • Move the mouse pointer to the right and view other cascading menus.
  • To exit the menus, click outside the menu area or press Esc on your keyboard.
The Start menu remembers items you've recently opened and places the icon on the Start menu so you can easily open it next time you open the Start menu. For example, if you recently opened Microsoft Word using Start  All Programs   Microsoft Word, the next time you open the Start menu, simply click the Word icon on the left side of the Start menu.
................................................................................................................................................................

Understanding Icons

The small pictures on the desktop are called icons. One type of icon is an object icon. Examples of object icons are My Computer, Recycle Bin, and Internet Explorer. These icons allow you to open files and programs on your computer.


Shortcut icons allow you to open an application quickly. These icons appear on your desktop and with little arrow in the left corner. Desktop shortcuts are links to files and programs. You can add or delete shortcuts without affecting the programs on your computer. You'll learn about creating shortcuts in a later lesson.


To open a program using an icon:
  • Place your mouse over the icon.
  • Text appears identifying its name or contents.
  • Then, double-click the icon.
...................................................................................................................................................................

Understanding the Taskbar

The taskbar is the small blue bar you see at the bottom of your desktop. It contains the Start menu and the Quick Launch bar, which contains icons for Internet Explorer, Windows Media Player, and Show Desktop. Click an icon to open a program. Click Show Desktop to quickly view your desktop without closing any programs or windows.


The box on the right is called the Notification Area. Here, you'll find the clock and several other icons depending on what you have installed on your computer. Other icons appear in the Notification Area detailing the status of your activity. For example, when you're printing a document, a printer icon appears. Microsoft also uses the Notification Area to remind you when software updates are available for download.


When you open or minimize a window or program, a rectangular button appears on the taskbar that shows the name of the application. These buttons disappear when you close a window. Learn more about switching between windows in lesson 4.

.................................................................................................................

Log off and Switch Users

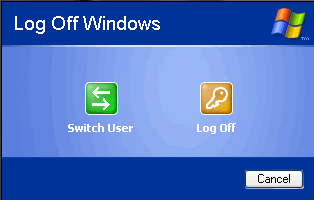
More than one person may use your computer. For example, many family members may use the same computer at home while several coworkers may be able to access your computer on a computer network. Windows XP allows everyone who uses your computer to have separate computer accounts. A computer accounts tracks each person's unique settings, documents, and email accounts.
Windows XP even enables you to log off the computer so someone else can log on without having to restart the computer.
To log off/switch users:
  • Click the Start menu and click Log Off.
  • A dialog box appears asking you if you want to Switch User or Log Off.
  • Switch User allows someone else to log on to the computer. If you choose to Switch User, your applications will continue to run in the background while the new user logs on.
  • If you choose Log Off, your applications will close.
  • In any case, you're taken to a Windows XP logon screen where you're prompted to enter your username and password.


.....................................................................................................................................................................

Turn Off and Restart the Computer

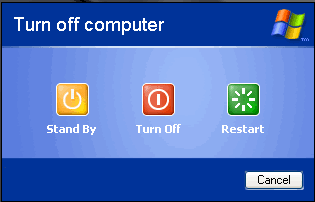
When you've finished using Windows XP, be sure to turn off (or shut down) the computer correctly.
To turn off the computer:
  • Click the Start menu.
  • Click Turn Off Computer.
  • A dialog box opens. Click Turn Off.


If you're experiencing computer problems or have installed something new, you can simply restart your computer.
To restart the computer:
  • Click the Start menu.
  • Click Turn Off Computer.
  • A dialog box opens. Click Restart.
Always turn off or restart your computer using this method. Do not turn off your computer by switching the power off and on. If you do so, you may damage Windows XP.
.......................................................................................................................................................................

Challenge!

  • View the Start button, taskbar and icons on the Windows XP desktop.
  • Click the Start button and view the cascading menus.
  • Practice logging off and switching between users.
  • Shut down your computer properly.